
Though the needles used are tiny, the practice of microneedling is huge.
We’ve well and truly entered the age of modern skincare, where skin-boosting practices are coveted. However, you may be wondering if microneedling could be right for you.
In this Guide, we’ll cover:
- How microneedling works
- Why it’s done
- Potential risks
- Affordability and accessibility.
Let’s run you through how it’s done!
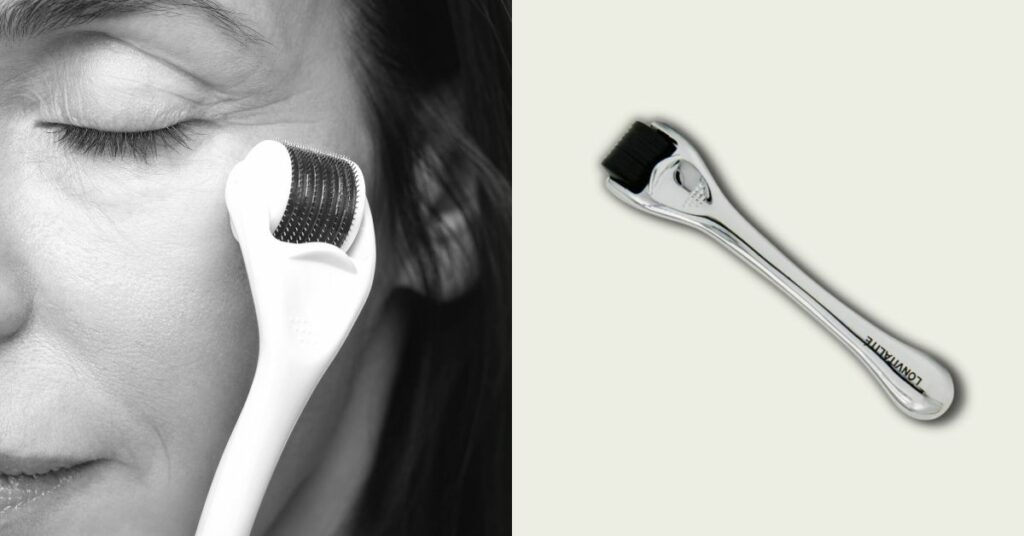
What Is Microneedling?
Microneedling (dermarolling) is the process of piercing the top layer of your skin using a tool fitted with tiny needles.
Your skin responds to this damage by producing collagen and elastin, proteins that contribute to even, bouncy skin.
The procedure is quick and non-surgical, and since the needles used are so small, you’ll heal relatively quickly.
Microneedling is an affordable way to achieve brilliant skin results. Many celebrities swear by this treatment, including Angelina Jolie and Kim Kardashian!
How Does It Work?
Microneedling is performed using a hand-held pen or roller device with tiny needles on it. The pen/roller can be moved manually or electrically charged.
Rolling or stroking the roller across your face creates tiny punctures. It’s relatively painless since the pin-pricks are so shallow.
When your skin recognises this damage, it starts to repair itself via dermal remodelling. Collagen is generated, which heals the skin and strengthens it.
By periodically microneedling your face, your skin will produce more and more proteins— thus making it smooth and strong.
The Benefits of Microneedling
Many people gravitate to microneedling because it’s a non-surgical way to improve the skin’s texture. It’s also significantly cheaper and less painful than surgical methods.
Microneedling can reduce the appearance of:
- Wrinkles and fine lines
- Stretch marks
- Acne scars
- Hyperpigmentation
- Enlarged pores.
Can You Do Microneedling at Home?
We all want healthy, glowing skin, but facials, skincare products, and of course, cosmetic surgery can all create a huge dent in our bank accounts.
Microneedling at home is a way to cut into those costs.
You can readily purchase microneedling tools and learn to use them at home. However, you will need to take caution — there are risks involved.
The main risk is infection.
When you break the skin barrier, bacteria jumps at the chance to enter it. Without properly washing and sanitising your face or your microneedling tool, you could bring about an unwanted infection.
It’s especially risky if you already have open wounds, active acne, or pimples on your face.
As the needles enter your skin, this bacteria could be pushed deeper into your skin’s layers. Be careful to avoid these areas!
The harder you push the needles into your skin, the more damage will be caused.
Pushing too hard or repeatedly going over one area can result in scarring and bruising.
So, yes— microneedling is very doable at home. But before you start rolling, do your research — know the risks, and take the necessary precautions. Then, roll your way to smoother skin!
An In-Depth Guide to Microneedling at Home
Choosing the Right Derma Roller
Derma rollers are hand-held microneedling tools. Typically they have a barrel-shaped roller with needles attached to it, which you glide over the skin.
There are certain factors to think about when choosing a derma roller. For instance, you’ll use a different needle length depending on your skin situation.
Here’s the needle length Healthline recommends:
- Shallow acne scars: 1.0 mm
- Deep acne scars: 1.5 mm
- Enlarged pores: 0.25 to 0.5 mm
- Postinflammatory hyperpigmentation (blemishes): 0.25 to 0.5 mm
- Skin discolouration: 0.2 to 1.0 mm (start with the smallest)
- Sun-damaged or sagging skin: 0.5 to 1.5 mm (a combination of both is ideal)
- Stretch marks: 1.5 to 2.0 mm (avoid 2.0 mm for home use)
- Surgical scars: 1.5 mm
- Uneven skin tone or texture: 0.5 mm
- Wrinkles: 0.5 to 1.5 mm.
In this diagram, we demonstrate how the different lengths can penetrate deeper layers of the skin and in turn, treat different skin concerns:

You will need to correctly identify your skin concern(s) before derma rolling; a skincare specialist can help you do this!
As a general rule, start with a smaller needle and press very lightly. Deeper or harder does not equal more effective!
People say drive to the conditions — here, roll to the conditions!
Stainless Steel vs. Titanium Derma Rollers
The two best materials for derma rollers are stainless steel and titanium.
Stainless steel is sharper and more sterile in nature. On the other hand, titanium has greater durability.
It doesn’t matter which material you choose — both will work!
There isn’t a huge difference in cost per use, either, so go for whichever is more available to you.
Step #1: Disinfect the Derma Roller
Breaking the skin with a dirty derma roller is a big no-no. Never pierce your skin with anything that isn’t sterile!
To sanitise your roller, soak it in 70% isopropyl alcohol for 10 minutes.
Alternatively, spray it thoroughly with a sanitising spray and leave it to dry for 10 minutes.
Step #2: Wash Your Face
You’ll need a clean base — no dirt, sweat or makeup residue! For this step, you can use your typical cleanser.
If you’re using a roller with needles longer than 0.5 mm, wipe your face with 70% isopropyl alcohol as well.
Step #3: Apply Numbing Cream (Optional)
If you want a more comfortable rolling session, apply numbing cream beforehand. The longer the needle, the more painful it will be.
Look for a cream with lidocaine, and follow the directions on the label.
Make sure you remove all the cream before you start rolling, though!
Step #4: Start Dermarolling
Make a plan before you roll. That way, you won’t miss any areas or overdo it.
These are the steps Healthline recommends:
- Imagine your face is split into quarters. Focus on one quarter at a time. Exclude eyes and lips.
- Roll lightly in one direction four times, lifting after each stroke. Continue rolling strips until you’ve covered one section. Then, repeat on the other sections.
How to use a derma roller on your forehead and brows:
 How to derma roller on your cheeks:
 How to use a derma roller on your upper lip and nose:
 3. Your entire face should be rolled now. If you did the first round vertically, then round two will entail layering horizontal strokes over top.
 How to derma roller on your cheeks:
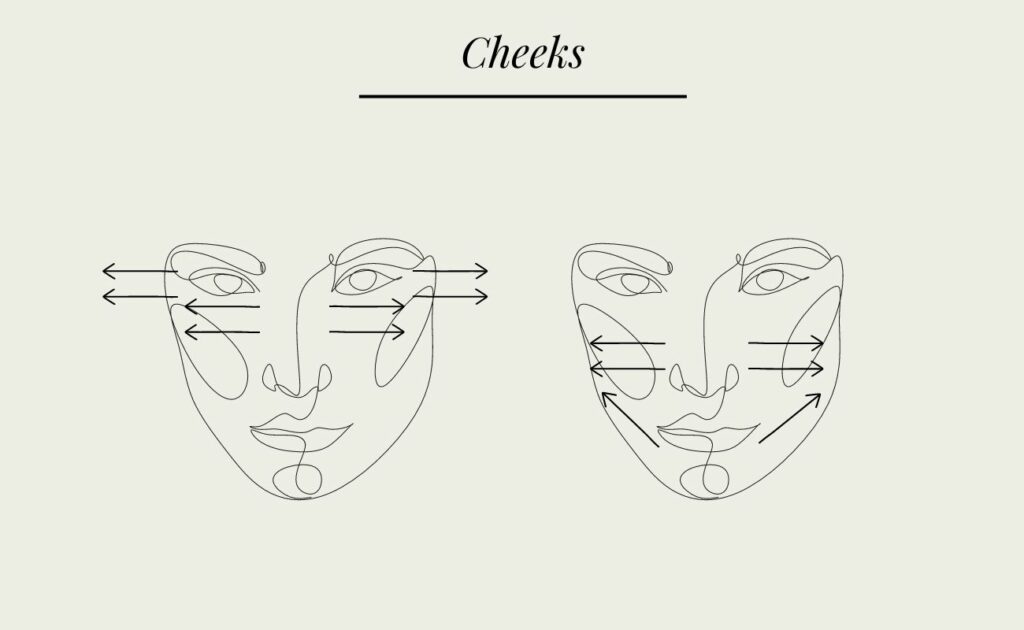 How to use a derma roller on your upper lip and nose:
Step #5: Rinse Your Face with Water Only
Now that you’ve successfully microneedled your face, be sure to only use lukewarm water on your skin for the next 48 hours.
This is because you’ve broken the skin barrier and introducing any products could cause irritation.
If you like, you could use cooler water for a cooling sensation— but don’t go too cold!
After a couple of days, you can use a gentle face wash again.
Step #6: Clean the Derma Roller
Swish your roller in a bowl of water and detergent. Do not scrub the roller or scrape it on the side of the bowl.
Step #7: Disinfect the Roller Again
Soak or spray the roller in the 70% isopropyl alcohol once again.
Step #8: Continue Your Basic Skin Care Routine (Don’t Use Exfoliants!)
By rolling your face with needles, you’ve created tiny channels in your skin. Your products will sink into those channels and create a more beneficial effect. Consider a calming and hydrating sheet mask like the La Roche-Posay Cicaplast B5 Mask or the Medik8 Ultimate Recovery Bio Cellulose Mask or a nourishing face oil.
Just be sure to leave a good 48 hours before you begin using your normal products again. Don’t use either exfoliants or active ingredients, either, because you don’t want to damage the skin further!
Is Dermarolling Worth It?
Dermarolling is popular for good reason — it’s quick, effective, and you can do it yourself.
Set up a clean environment and use a clean tool for the best results.
If you do your research beforehand, you have the best chance at success.
Of course, going to a professional is ideal, but many of us prefer a DIY version.
How Often Should You Derma Roll?
You need a break between sessions, so your skin has time to regenerate. The longer the needle, the longer healing time required.
If you use a 0.5 mm roller, it’s recommended to use it 1–3 times a week (starting with 1).
If you’re using a 1.5 mm roller, once every 3–4 weeks is best.
Visit a professional for longer needle use.
After a derma rolling session, your skin may bleed, feel hot, swell or throb a little. Your skin may also peel or flake for a few days – this is nothing to worry about.
If, however, the redness persists, or you notice infection or intense bruising, see your doctor or skincare professional for advice.
The Bottom Line
Responsible skincare enthusiasts should give derma rolling a try.
While it’s recommended to visit a professional for the procedure, it can be done at home too.
Analyse your skin first, so you know which areas to target with which needle length.
Always sanitise your equipment and start slowly, with light pressure.
Once you get the hang of it, you will likely see an improvement in your skin.
Good luck, rollers!
Sources
- https://my.clevelandclinic.org/health/treatments/23113-microneedling
- https://www.ncbi.nlm.nih.gov/pmc/articles/PMC7869810
- https://www.pmuhub.com/microneedling/microneedling-gone-wrong
- https://www.northstardermatology.com/blog/benefits-of-microneedling-aging-acne-and-scars
- https://www.rmclinic.co.uk/microneedling-the-celebrities-choice
- https://www.healthline.com/health/beauty-skin-care/dermarolling-how-it-works-before-and-after#how-to-choose
- https://www.healthline.com/health/beauty-skin-care/dermarolling-how-it-works-before-and-after#stainless-vs-titanium
- https://caci.co.nz/blogs/skin-101/skin-101-how-to-use-a-derma-roller
- https://www.healthline.com/health/beauty-skin-care/dermarolling-how-it-works-before-and-after#how-to-use
- https://www.healthline.com/health/beauty-skin-care/dermarolling-how-it-works-before-and-after#how-often
